Monday 24 May 2010
Post Submission Thoughts
So I handed the costume in for submission this morning and I am feeling really disappointed. I don't feel as if I could have worked any harder, 12hours at uni everyday this week is really catching up with me now and yet I don't feel as if I have progressed an awful lot. Thankfully all the lining is in (with the exception of the neckline of the frock coat being pinned in place at the moment) I think this has most definitely been my biggest challenge but I have learnt an awful lot and now appreciate just how much time and precision it takes to get the work done effectively. But seeing it on the stand unfinished knowing that it's going to be assessed like that is actually a very depressing thought. If there's one thing I've learned from this, it is that I really did underestimate the entire unit. I thought 9 weeks would be ample time to produce this work to a high standard, but oh how wrong I was. I do believe the work I have submitted now has been made to a good standard, I just need some peace of mind that my mark will reflect my endless efforts. So submission = a working progress, the end is near..I hope.
SDP Final Evaluation
This project has been a huge learning curve for me. Throughout the unit I have felt extremely privileged to be making this costume for the Wimborne Town Crier. Looking back to November 2009 when Chris Brown came to the studios to show off his 18th Century costume, I knew immediately that I would really enjoy producing a brand new one for him as my Self Directed Project. I thoroughly enjoyed our tailoring unit at that time and decided it was definitely a skill I wanted to carry on practicing in the new future. And so when this opportunity was offered to a second year costume student I thought it was my full responsibility to apply for the job.
When the project started I was very enthusiastic and extremely excited to get the ball rolling. I started doing some general 18th Century research very early on in order to prepare myself for the upcoming months. I was in regular contact with Chris Brown via phone and e-mail and his enthusiasm really encouraged me to make a flying start with the project.
The first week of the project was when I had my first tutorial with Graham and we discussed exactly what I should do to get me started efficiently. To begin with I had happily taken on the task of making a costume for Chris and replica costume for his 11 year old son Eddie. However after a lot of researching, it became quite apparent to me that it really was too much work for me to take on board and accomplish successfully in the nine weeks available. This was when I decided to ask a course mate if they would like to work alongside me and produce the smaller costume. My course mate Kelly had decided to change from design to making for this unit, and so when I suggested it to her, we both believed it would be the perfect challenge for her to find her feet in making again.
Kelly and myself had a meeting with Chris and his son Eddie in the first week of the project. We had both collected a sufficient amount of research to show to the both of them and the four of us felt very confident about the entire unit by the time the meeting had finished. I asked Chris exactly what it was he was expecting from a brand new costume and made a list of requirements and specific features that Chris really wanted. This allowed the project to have a flying start and we began pattern drafting straight away.
I have drafted patterns for all the making units over the past two years now and I really was feeling more and more confident about it this time round. The biggest learning curve this time was working alongside Kelly who had to produce patterns on a much smaller scale. We had to work very closely so that the patterns were identical but on two completely different scales. I think we learned a lot from one another and it was obvious that the team work really contributed to getting the patterns drafted in good time.
I was well on my way with producing the toile and creating my own time schedule really helped me to keep up to date with everything I was doing. This was also something that has benefited me throughout the project. Time management has always been a slight flaw of mine and so I set myself the challenge to follow my own strict timetable. I didn’t feel too confident about achieving this but I’m really pleased to say that I seem to have overcome this challenge and not failed once with this task.
As always I did encounter some problems along the way, the biggest one being the most inconvenient; falling ill. This really did throw a spanner in the works so to speak and unfortunately I fell behind pretty fast. However as soon as recovery was present I wasted no time and got myself straight back into it. By this time the toile fitting had taken place and I had a very successful result and felt confident once again about producing a really good quality costume.
Other lessons learned came from further practicing. Dyeing fabric was another big accomplishment, I’ve felt for a long time that this was something I needed to practice more often, and so when it came to dyeing some expensive Moleskin I believed this to be the perfect opportunity to perfect my skills and now it’s done, I’m feeling confident that I did.
What really helped me with this project was the fact I had made something quite similar to this for Concepts In Context unit. The coat was of a similar cut so I began to understand the period more and more and how features such as pleats should be constructed professionally. However, the processes I used for that unit were nowhere near as complex and precise as what I’ve had to do this time round. When it came to things like linings, I found myself quite frustrated with being able to accomplish it to the best of my abilities. I appreciated Graham’s methods and was eager to learn and practice them the correct way. However this meant yet another learning curve and so the actual process was very time consuming for me and I found myself behind schedule again. Now the lining is fitted and finished I am really pleased with the precision and care I have taken over it, the one thing I have had to keep telling myself is that this isn’t ‘Panto’ and in no respects can be rushed. Never before have I individually made for a client and so I found myself constantly reminding myself just how important it is to use my time effectively and produce work of a very high standard.
Chris would like to think that he will be wearing this costume for the next 5-10 years and so it is vital that every stitch I make is precise, accurate, and strong.
Working for a client is undoubtedly the biggest learning curve for me. Looking at the work and knowing I’m not creating it for myself was hard, very hard, and so I wasn’t able to meet just my own expectations but also those of Chris, my coursemate Kelly and my unit leaders. I have felt incredibly under pressure with this costume. People have recognised me as the maker for the town crier and so this is hugely important to Chris and the community and the university as they have funded the entire project.
This added pressure did unfortunately result in time loss and lack of confidence, but visualising the end result in my mind has always picked me up again and encouraged me to do my upmost best.
Working with my chosen fabrics has been really interesting and again I have learned a lot. My one flaw with this project is that I completely underestimated exactly what was being asked of me and I genuinely believe I still encountered too much work for the timeframe I had. I’m still learning important processes and this meant I found myself struggling with areas I wasn’t too experienced with. However I feel I have really overcome this and believe the work so far is at a standard to be proud of.
If this project is something I’m likely to re-experience in the near future I would most certainly know that learning and producing something like this is time consuming and often tedious and so allowing myself more time would be highly necessary.
I also feel confident with working for a client now. This was all new to me and I really didn’t know what to expect, but Chris’s character and enthusiasm has meant that I have thoroughly enjoyed working for him and still feel immensely honoured to have produced this brand new 18th Century costume for him.
It’s really unfortunate that I’m having to submit this work as a working progress. I really hoped that it would be finished for the proposed deadline, however it has been vital that I don’t rush this and technically Chris doesn’t need it until the end of June so I still have a good month to get everything finished to perfection. I believe I have submitted an efficient amount of work when considering problems I have encountered and I only have last minute things to finish and decoration to apply and I am more than happy to spend the next month doing it if it is necessary.
Over all a thoroughly enjoyed project which has experienced ‘ups’ and ‘downs’, taught me an awful lot, and left both myself and the client happy with the result.
Monday 17 May 2010
Week 10 Review
The trimmings and decoration have ARRIVED!!!! The excitement Kelly and myself experienced the morning the package was delivered was actually deafening but yes all of the decoration is now with us and it looks even more exquisite in the flesh, we are both really pleased and we know Chris and Eddie will be excited to see it all. The decoration has come from Fucotex and wasn't that cheap, not cheap at all actually, but it's here now and it really is going to finish both costumes beautifully. Imagining them both finished with all the trimmings is what has been keeping me going this week. I fell ill again over the weekend and as a last and reluctant resort have accepted the offer of a weeks extension from Adele. I really didn't want this extension, especially as I had managed to get myself back on track the last time, but realistically speaking I've unfortunately had too much time out of the project due to illness and there is no chance of it being finished for the original deadline. This has really got me down this week knowing that I can't progress enough to get it finished, however I'm seeing it as a blessing in disguise as at the end of the day this is a very important costume which is being funded by the university and it will be what my client has been wanting for a long time now. So I no longer want to let the timeframe interfere with what I'm doing. Technically I have until the beginning of July to get the costume completely finished and I think it's entirely necessary for me to use that time wisely is order to produce the perfect costume and provide exactly what has been asked of me to a high standard. I've also told myself that looking back on the past 9 weeks, I've learned so much and practiced skills I already have, yes this week has been a bit of a blow and I've encountered some problems a long the way which have unfortunately compromised the project a little. I now have one more week until I submit this unit and I'm going to work as best I can to hand in exactly what I intended on handing in, however both Graham and Rebecca have told me this must not be rushed and I think it is wise to take their advice.
Sunday 9 May 2010
Week 9 Review
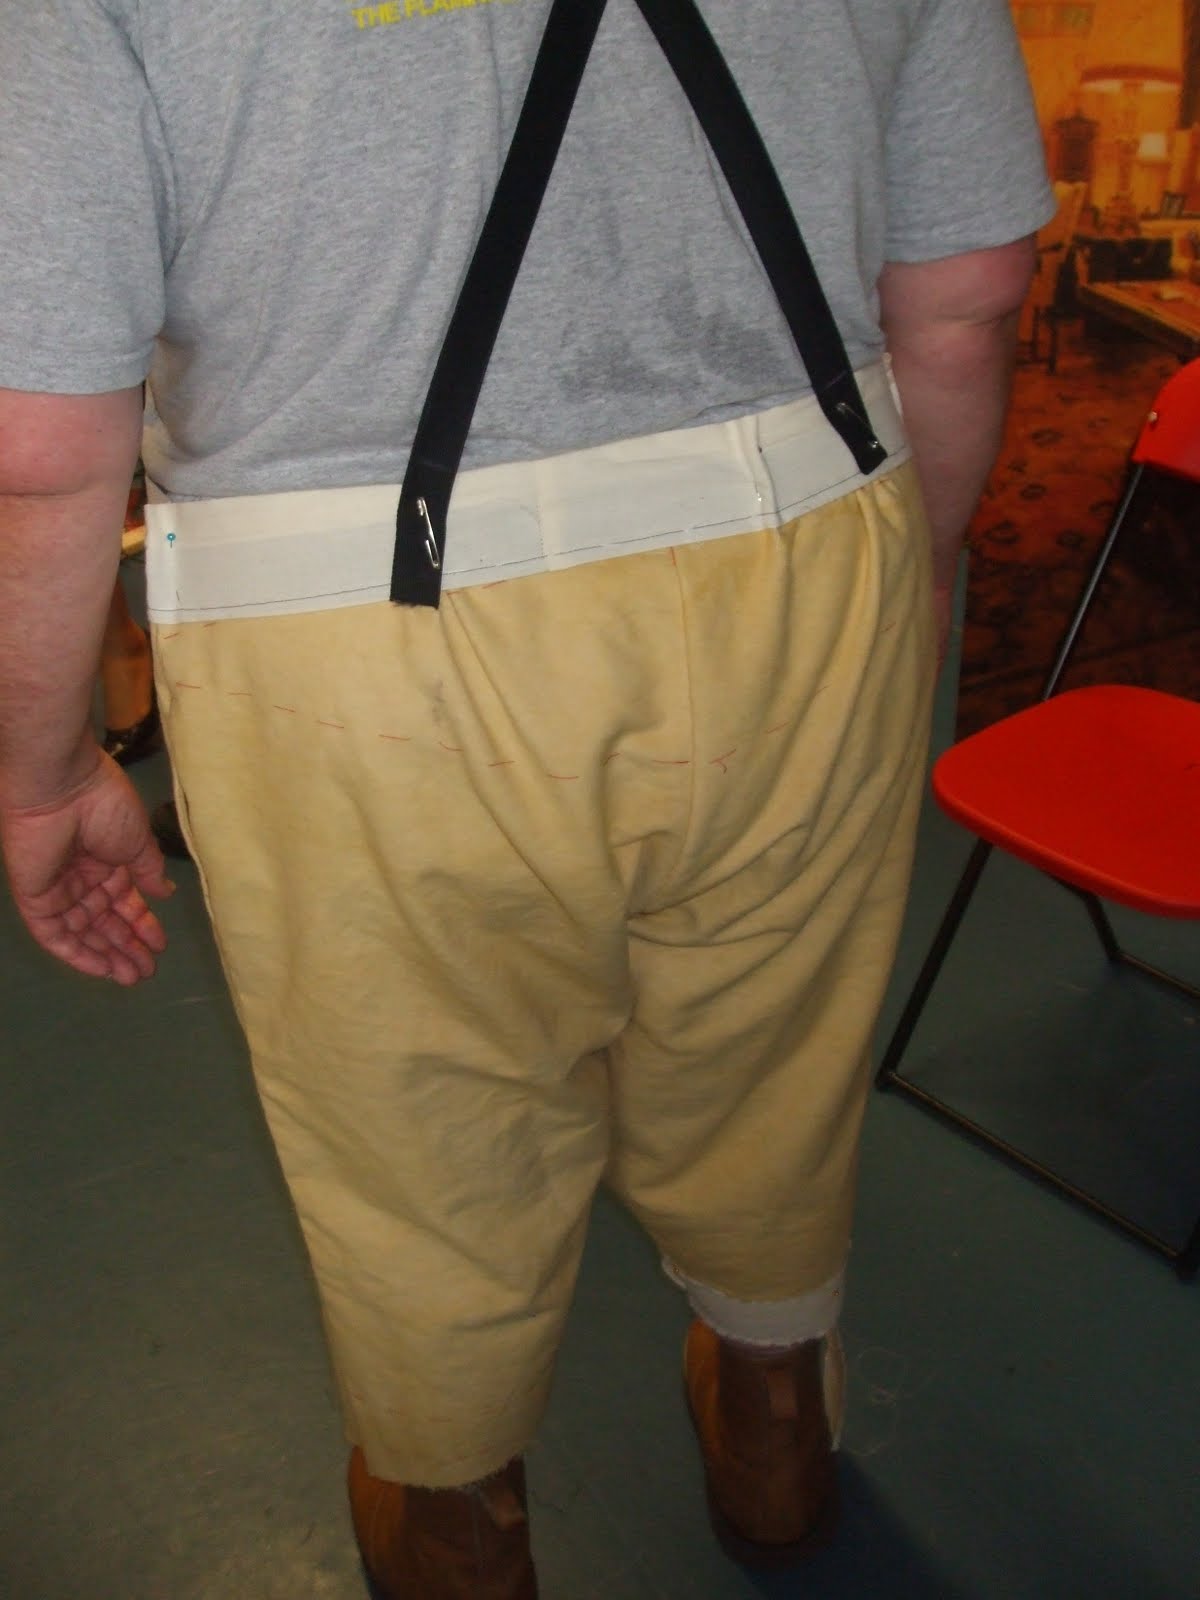
So I've now just returned to Bournemouth after spending the weekend at home in Cornwall. I've managed to do a little more ongoing research this week as well as cracking on with getting the costume together for the final fitting. Again the costume is still very much a blank canvas but again the fitting on Thursday was successful and everything fitted fine. The only issues I had that I'm still a bit unsure about is some of the design features. Graham was away in Istanbul this week so was absent from the fitting. Katerina stood in for Graham and seeing as she made Chris's current costume, it did put my mind at rest a little bit. What with this being the last fitting before completing the costume I was feeling quite nervous about it all. However design ideas that were discussed with Graham during the first fitting were replaced with others at the 2nd fitting and so I was and still am feeling quite confused about it all. The main issue being the breeches, I'm trying to keep them as historically accurate as possible as well as making them to how Chris wants them, but things were discussed at this fitting that hadn't come up before, such as pleating the fabric at the knees and applying a shaped waistband. I've been having to constantly tell myself that I must always meet the needs of the client and only the needs of the era in question when necessary. I'm just struggling with it a bit now, have found myself at a bit of a dead end...NEED GRAHAM!
Friday 7 May 2010
SDP Final Fitting
Today Chris came to the studio for the final costume fitting. I was lucky enough to have Katerina assist me at the fitting. Seeing as she made his current costume she was more than happy to stand in for Graham.
 Again the fitting was a success which was a relief seeing as there hadn't been a lot of tuition avaiable this week so I had to work completely independantly and use my inititive to conquer any problems I came across.
Only a couple of cms needed to be taken in on the breeches, otherwise the fit was absolutely fine and Chris felt comfortable.
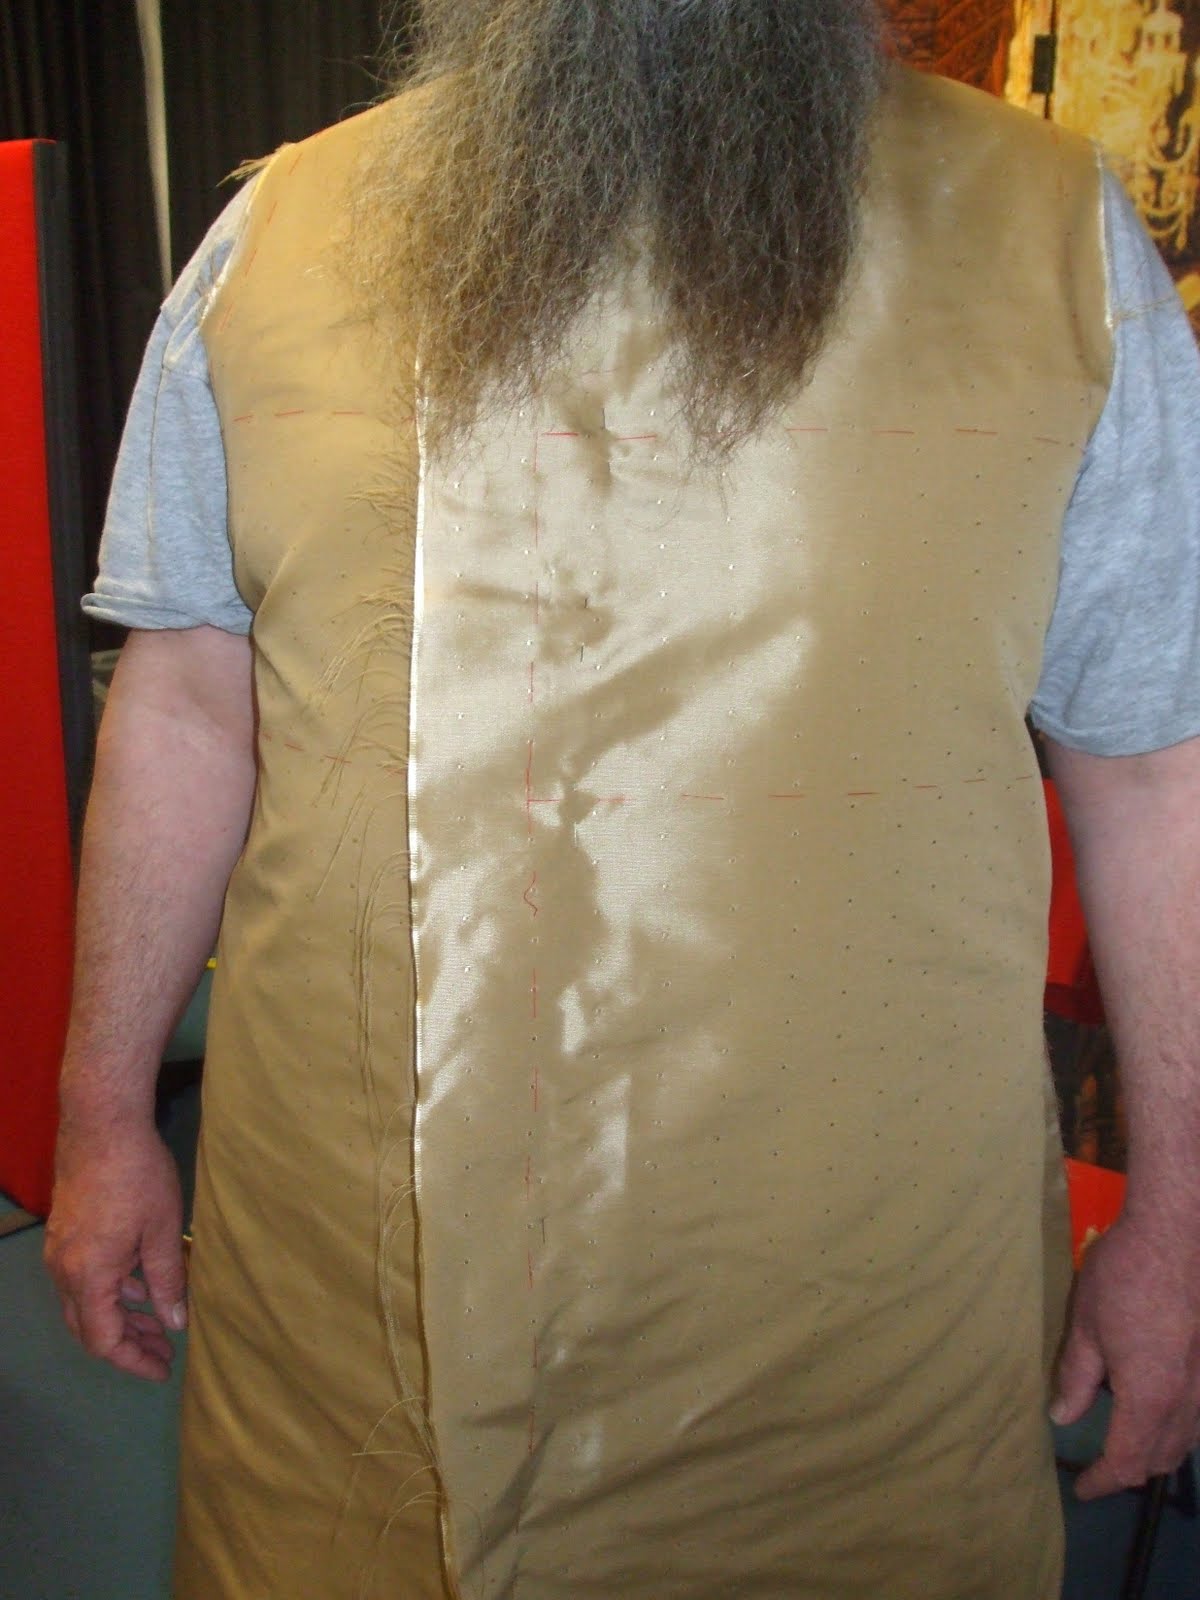
 The waistcoat needed to be taken in at front and back - I expected this though as I allowed extra when cutting the fabric.
 Chris was happy with the length to the back of the waistcoat. To be a little more historically correct, the back must be shorter than the front, however Chris wanted it at a fuller length for when he's not wearing the frock coat.

I allowed a lot of allowance on the length of the waistcoat in order to get an official opinion from Chris. We settled for just above the knee as expected, this also works with the period of the costume.

Chris liked the look and weight of the fabric - the decoration will finish it really nicely.


The frock coat was a really lovely fit today and I'm really pleased. It has been a struggle working with so much fabric so I'm glad there are no alterations to make here.

I decided mutually with Chris again about the length and we agreed on about 3-4inches longer than the waistcoat.

The sleeve went in really nicely and Chris felt spacious in it. I'd widened the sleeves a lot to accommodate for Chris's crutches. The crutch fit inside the sleeve un-noticably and again Chris felt there was plenty of room to move comfortably with.

The Cb seam had to be taken in ever so slightly in order to be that little bit more fitted.

All the pleats sat well and fell correctly.

Over all it was a very successful fitting, a bit long winded,it took longer than it should have done but at the same time I didn't want to rush it and risk missing something.

I allowed a lot of allowance on the length of the waistcoat in order to get an official opinion from Chris. We settled for just above the knee as expected, this also works with the period of the costume.
Chris liked the look and weight of the fabric - the decoration will finish it really nicely.


The frock coat was a really lovely fit today and I'm really pleased. It has been a struggle working with so much fabric so I'm glad there are no alterations to make here.

I decided mutually with Chris again about the length and we agreed on about 3-4inches longer than the waistcoat.

The sleeve went in really nicely and Chris felt spacious in it. I'd widened the sleeves a lot to accommodate for Chris's crutches. The crutch fit inside the sleeve un-noticably and again Chris felt there was plenty of room to move comfortably with.

The Cb seam had to be taken in ever so slightly in order to be that little bit more fitted.

All the pleats sat well and fell correctly.

Over all it was a very successful fitting, a bit long winded,it took longer than it should have done but at the same time I didn't want to rush it and risk missing something.
Sunday 2 May 2010
Week 8 Review
This week has been all about cutting out our top fabric. The week hasn't been too much of a learning week, I've just concentrated on getting all of my pieces cut and tacked ready for the next stage. I took care over cutting the Melton and the Moleskin, making sure the grain was lying in the same direction for every piece. Dying the Moleskin has been tedious this week however I've never worked with Moleskin before and seeing how well it takes to dye has been really interesting. The decision was made to dye the breeches a more neutral golden colour to stick with the theme of Dorset colours and then match the waistcoat to the breeches instead of the frock coat. So the plan was to get the breeches looking a nice shade of antique gold. It took a total of 3 dye trials to get the right colour. After the 3rd test both Kelly and me were happy with the tone we had achieved. Adding only the smallest amount of dye every time made it a very tedious and time consuming process. However after the 3rd dye we dried the fabric to realise it was still actually quite patchy, there was just too much fabric to fit in the dye vat evenly. However after 3 dyes and numerous washes it was quite apparent that the fabric hadn't shrunk so a mutual decision was made to cut the pattern pieces and then dye for a 4th time in order to get an evenly applied colour. Other than that the week has gone pretty well. Note to self being if I were a little more confident with dyeing it may have been a much quicker process..more practice needed in this area I think.
Friday 30 April 2010
Road Trip to Hansons and Fabric Warehouse
Today Kelly and I ventured to Hanson's Fabrics in Sturminster Newton. I've shopped there many times before and have always been impressed with their selection of buttons. I spoke to Chris prior to the trip and he gave me free reign on the detail to the costume. Kelly and me re-visited our historical research but also considered detail from a military perspective. We searched the store for something plain and bold yet striking to the eye and we found the perfect buttons. The buttons came in different sizes as well so I got the largest size so that the two costumes will stay in proportion with one another. I then thought a slightly more detailed button would be nice for the waistcoat seeing as it won't have as much embroidery work as the coat and again we found a nice authentic button available in different sizes.
On the way back to Bournemouth we stopped off at Fabric Warehouse in Poole to collect the top fabric for the waistcoats. I'd already collected a sample and studied it with Kelly and we mutually decided that it was an ideal fabric for the waistcoat. Chris's current waistcoat has a large pattern on it and we decided with Chris that we would have to work with a plainer fabric with a small or even no pattern so that Eddie won't get lost in it.
Now we have all of our top fabric and have detail to add the project is getting even more exciting and Chris is eager to see the costume as a finished piece.
Tutorial/Progress Report No.3
So today I found myself in a little trouble with Graham..I've slacked a lot on keeping my blog up to date recently so we discussed making sure that I REFLECT, REFLECT, REFLECT! I think I tend to do it naturally anyway and evaluate everything I'm doing, I knew I had more blog work that needed doing, the costume has just taken priority for the past 2 weeks, but I'm all up to date now and have ready through everything and feeling very happy with my progress so far.
Decoration/Finishings consideration
Today we have been considering trimmings and braids for the costumes. I spoke to Katerina about where she purchased the trimmings for Chris's current costume and she recommended Fucotex to me. Kelly and I paid a visit to the costume archive to study the Fucotex files and samples. I liked nearly all of the trimmings they had available but one design in particular stood out the most as it was red white and gold and had a very striking pattern that I thought was quite symbolic when referring to military features. In contrast the design has a natural element to it with oak leaves. As Chris is a country side town crier, both Kelly and I agreed that this design was more than appropriate.
The design is wide and will really stand out on the centre front of the coat. It has a narrower option which will be ideal for the cuffs on the sleeves and even a matching design for pockets.
The images below are of the design I have chosen, I have sent the images to Chris and he has approved them happily.


The image below is the trim that Kelly has chosen for Eddie. We both agreed that his costume would need something different as he is so small. This white and gold design is a lot narrower and will highlight the detail in Chris's costume really well.

Tuesday 27 April 2010
Dyeing Moleskin For Breeches
Looking at my historical research I've decided that an antique tone would be best for the colour of the breeches. Maybe an antique gold? This would work really well for the colour theme I'm working with.
The image below isn't quite the right colour for what I aspire to achieve but it's a really good reference for me to have as it gives me a good idea of how the finished pair will look.


This is the moleskin I dyed today using the following recipe
- 5 litres water
- 1 1/2 cup salt
- 1/2 tsp Golden glow
- 1/4 tsp Reindeer beige

There was 3 1/2 metres of moleskin to dye and the dried result was quite patchy and the colour is still a little too pale. What I will do now is make sure the fabric doesn't shrink, then cut my pattern pieces and re-dye them. I'll also add another 1/4 tsp of golden glow to get a more golden tone and will leave them in the dye for at least another 10 mins.
Monday 26 April 2010
Chris Brown in Action
I'm posting a link that gives an insight into how versatile Chris Brown's town crying career is. Knowing the sort of "gigs" he cries for allows me to be a bit more adventurous with creating Chris's costume as I really want it to make a statement and reflect Chris's personality.
http://www.efestivals.co.uk/festivals/endorseitindorset/2009/photos-ChrisBrownTownCrier-EndorseItInDorset09-KAW.shtml
The images provided on the link above really show how much of a contribution the costume gives to the event and Chris's role as town crier.
http://www.efestivals.co.uk/festivals/endorseitindorset/2009/photos-ChrisBrownTownCrier-EndorseItInDorset09-KAW.shtml
The images provided on the link above really show how much of a contribution the costume gives to the event and Chris's role as town crier.
Sunday 25 April 2010
Week 7 Review
Well now this week has been exceptionally successful and I'm feeling extra confident about the project now. Tuesday's fitting was a huge success and everything fitted beautifully with the odd bits in need of a couple of cms decrease which I was expecting anyway. Chris was really pleased with how the costume has come along. Obviously being a toile fitting it is still very much a blank canvas, but he was happy with the cut, the style, lengths and fits, and I had some research to show him which was more than exciting. I asked Kelly if she would assist me alongside Graham in the fitting. I thought this would be wise as we scheduled with Chris to fit Eddie ourselves at his house later that evening so that the fitting wouldn't interfere with Eddie being at school. This meant that any fit/design adjustments that were made to my costume could be logged and transferred to the fitting for Kelly's.
After the fitting both Kelly and me decided that it was highly necessary to purchase our top fabrics ASAP. Graham recommended that we source a box fabric for the frock coat. We visited the archive and really liked the samples from H.E Box Ltd in Weymouth. I gave them a call to make sure they had the samples available and had plenty of it, to which they said they did,so Kelly and myself set out on a brief road trip to Weymouth. The manager of the store was so helpful and within the half hour of being there we learned an awful lot about the fabric we would soon be working with. The Melton fabric that we chose is a very popular fabric for Town Crier costumes so already that was really good to know. The fabric is obviously a great success for this particular area so at least we can be sure we have made the right decision about that. The fabric is also a lot wider than average which is also good as my patterns in particular are quite large and I need to accommodate for all of the pleats. The one thing we have to be extra careful with when cutting the fabric is the direction of the grain. Very much like Velvet the fabric lies smoothly in only one direction and can be noticeable to the eye if laying incorrectly. This is a fabric I have never worked with before so it will be interesting to see how well/easily I can work with it, and at nearly £30 p/mt I really am going to have to take extra care when cutting it. Kelly and I left the store with 6.5mts of deep red Melton and 3.5 mts of off white moleskin for the breeches. The rest of the week was then spent altering our pattern pieces after the toile fitting, and cutting our top fabric...SUCCESS!!
After the fitting both Kelly and me decided that it was highly necessary to purchase our top fabrics ASAP. Graham recommended that we source a box fabric for the frock coat. We visited the archive and really liked the samples from H.E Box Ltd in Weymouth. I gave them a call to make sure they had the samples available and had plenty of it, to which they said they did,so Kelly and myself set out on a brief road trip to Weymouth. The manager of the store was so helpful and within the half hour of being there we learned an awful lot about the fabric we would soon be working with. The Melton fabric that we chose is a very popular fabric for Town Crier costumes so already that was really good to know. The fabric is obviously a great success for this particular area so at least we can be sure we have made the right decision about that. The fabric is also a lot wider than average which is also good as my patterns in particular are quite large and I need to accommodate for all of the pleats. The one thing we have to be extra careful with when cutting the fabric is the direction of the grain. Very much like Velvet the fabric lies smoothly in only one direction and can be noticeable to the eye if laying incorrectly. This is a fabric I have never worked with before so it will be interesting to see how well/easily I can work with it, and at nearly £30 p/mt I really am going to have to take extra care when cutting it. Kelly and I left the store with 6.5mts of deep red Melton and 3.5 mts of off white moleskin for the breeches. The rest of the week was then spent altering our pattern pieces after the toile fitting, and cutting our top fabric...SUCCESS!!
Saturday 24 April 2010
Tutorial/Progress Report No.2
Second tutorial with Graham today and it has been really helpful. We discussed fabrics and progress with the project so far and all in all everything seems to be going ok and I'm feeling confident now that Graham is happy with my progress. I've informed Graham of regular discussions with Chris and it seems that everyone is happy to let me go about everything how I wish to as long as everything is decided via Chris first. The first fitting went really well so I can now source my fabrics and start considering decoration thoroughly.
Hello Top Fabric
So Kelly and me found the perfect and less time consuming way to get all the patterns cut and it involved spreading all 6.5mts across 4 studio work benches. We managed to get all the pieces on with enough remainding for sleeves and cuffs. We've managed to get the grain lying correctly through all pieces...good thing we opted to get an extra half a metre.
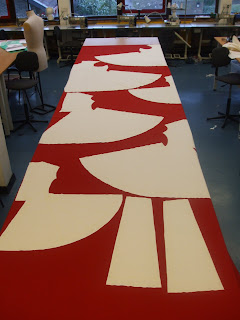 Now the breeches pieces are cut with a little extra allowance just incase of shrinkage and ready to dye for a 4th time.
Thursday 22 April 2010
Road Trip to H.E Box
Today myself and Kelly have made a trip to H.E Box Fabrics in Weymouth to choose our top fabric for the coat and breeches. Prior to the trip we visited our costume archive to study some H.E Box samples and we decided that the fabric was exactly what we needed. The store was also recommended to us by our tutor Graham so we made the trip and explored our options. The store manager was really helpful, he said he supplies a lot of his stock to local town criers so he was really quick to recommend particular fabrics. We had to keep in mind that the colours we are working with are red, white and gold, and the store had a limited amount of tones in those colours. Luckily we found a deep red medium weight melton for the coat and an off white moleskin for the breeches. Seeing as the moleskin is a pale colour we have made a mutual decision to dye the fabric to get a nice antique gold colour. We have already suggested this to Chris and he's more than happy to have gold.
The store manager was very helpful and gave us some good advice due to working with our purchased fabrics. The grain of the Melton lies on the length of the fabric so we will have to make sure that we take good care over cutting it. The fabric only feels smooth if the grain is lying in the right position (downwards) and will be noticeable if the patterns are cut differently. Because of this it meant we had to get quite a lot of fabric, I knew that I was going to need approximately a metre per pattern piece as the width wouldn't accommodate for two. So we had 6.5 metres of Melton cut just to be safe, and 3.5 metres of moleskin.
We are now ready to cut out our pieces in top fabric tomorrow and going by what I have learnt about the fabric today, I am going to allow a whole day to do it.
I'm feeling even more confident about the project now that I have the fabric that I need. It's good to know that I've gained some advice about the fabric along the way and I'm looking forward to putting pattern pieces together at the end of the week.
Tuesday 20 April 2010
1st Fitting
This morning Chris came in to the studio to have the first fitting and I'm so relieved to know that it was highly successful with very few changes/alterations to be made.
Breeches
The breeches were a really good fit, I've not made them before so I was really pleased with what I'd produced as a first attempt. Chris said they felt nice and spacious and he was comfortable in them whilst sitting and standing.
A small list of alterations below now show what I need to apply to my patterns before cutting out in top fabric.


Waistcoat
After fitting the breeches I got Chris into the waistcoat, my first thought was that I would have to snip into my allowance around the armhole, I was correct. I'd taken the waistcoat pattern straight from the coat pattern so I knew I would have to design the new armhole while the waistcoat was on Chris. In order to be historically accurate the armhole needed to be a lot bigger in order to make room for a wide sleeved loose fitting shirt and also for comfort/movement purposes. I cut the new armhole and Chris was pleased with how it looked and felt. Another slight adjustment was at the back of the waistcoat, again in order to be historically correct the CB should be slightly shorter than the front. Again I made a list of what I'd need to apply to my patterns but all in all the waistcoat fitted very nicely.
Next was to fit the coat and again I was very pleased to see how well it was fitting. I was intrigued to see how the pleats were going to look once on the body and how well they would fall in the length. What with the toile being made out of calico it wasn't an ideal representation of how they will look as the fabric was nowhere near heavy enough but it gave me a general idea and Chris was very pleased with how the costume was looking as an ensemble.
When I put the sleeves together I knew they were going to be narrow even though I allowed extra allowance. Chris not only wants the sleeves to be nice and wide for historial purposes but also because he often has to use crutches and would like them to side inside the sleeves comfortably. I removed the sleeves from the toile and fitted them with the crutches which made me feel a lot more confident about making them to exactly how Chris needs them.


Breeches
The breeches were a really good fit, I've not made them before so I was really pleased with what I'd produced as a first attempt. Chris said they felt nice and spacious and he was comfortable in them whilst sitting and standing.
A small list of alterations below now show what I need to apply to my patterns before cutting out in top fabric.
- Waistband is currently 4cms, make this bigger by a further 2.5cms (6.5cms).
- Heighten the CB by a further 5cms.
- Take the waistband in by 7cms but leave breeches as they are and gather into the waistband.
- Attach a pair of elastic braces via the waistband.
- Use a 5cm knee band to fasten breeches just below the knee


Waistcoat
After fitting the breeches I got Chris into the waistcoat, my first thought was that I would have to snip into my allowance around the armhole, I was correct. I'd taken the waistcoat pattern straight from the coat pattern so I knew I would have to design the new armhole while the waistcoat was on Chris. In order to be historically accurate the armhole needed to be a lot bigger in order to make room for a wide sleeved loose fitting shirt and also for comfort/movement purposes. I cut the new armhole and Chris was pleased with how it looked and felt. Another slight adjustment was at the back of the waistcoat, again in order to be historically correct the CB should be slightly shorter than the front. Again I made a list of what I'd need to apply to my patterns but all in all the waistcoat fitted very nicely.
- See toile for new armhole - apply to other side and pattern
- Keep waistcoat completely straight at CF from waist to hem for fastening
- Raise hem at CB by 8cms
Next was to fit the coat and again I was very pleased to see how well it was fitting. I was intrigued to see how the pleats were going to look once on the body and how well they would fall in the length. What with the toile being made out of calico it wasn't an ideal representation of how they will look as the fabric was nowhere near heavy enough but it gave me a general idea and Chris was very pleased with how the costume was looking as an ensemble.
When I put the sleeves together I knew they were going to be narrow even though I allowed extra allowance. Chris not only wants the sleeves to be nice and wide for historial purposes but also because he often has to use crutches and would like them to side inside the sleeves comfortably. I removed the sleeves from the toile and fitted them with the crutches which made me feel a lot more confident about making them to exactly how Chris needs them.
- The CF will fasten to just above the waist (approx) and then fall open to reveal waistcoat underneath
- Let out CF by 2.5cms to allow a little more room
- Drop all pleats by approx 2.5cms (see toile for markings)
- Drop this measurement in the length
- At CB pleat move seam 3cms (see toile)
- Widen sleeve by 5cms from head to wrist to allow for extra wideness for design purposes and to accommodate for crutches
- See toile for new sleeve length - shortened at wrist - historical purposes for frill on shirt


Sunday 18 April 2010
Week 6 Review
This week has been hectic yet productive. I managed to get back on track with getting my toile completely finished and ready for the fitting in plenty of time. The good thing about this costume is that there aren't that many seams to sew together as yet so getting it together took no time at all really. Working alongside Kelly this week has been a big learning curve. We've had to make sure that both costumes are in proportion with one another and that they are exactly the same cut. Seeing as Chris has a fuller figure I made sure that I allowed extra so that hopefully the only adjustments that will need to be made during the fitting are the odd bits of 'taking in'. I've also had quite a lot of contact with Chris this week which has been helpful. The odd minor yet vital information that I have needed is now all logged in black and white and so hopefully there won't be too many queries during the fitting on Tuesday. Origianlly I planned to fit Chris myself with no assistance at his house on Monday evening, however I later agreed with Graham that it would be best to have him assist me with it at the studio in case of any issues occuring. Over the past couple of days I managed to collect some more relevant research to show to Chris and I'm now fully prepared for Tueday's fitting session.
Saturday 17 April 2010
Tutorial/Progress Report No.1
Had first tutorial with Graham this morning, over all it was a little vague, just exploring general ideas and looking at first bundle of collected research, but I decided to make a lot of contact with Chris this week in order to gain as much primary information as possible. This should get the ball rolling nicely, once I've discussed with Chris, everything should fall into place and seem much clearer.
Monday 12 April 2010
Week 5 Review - EASTER BREAK
Ok so it's exactly one week tomorrow until the first toile fitting. I'm still very much unwell and feeling far from healthy which is why I'm not returning to uni for the first day of term tomorrow. I have spoken to Kelly and told her I won't be around but she is feeling pretty confident about getting her toile ready anyway so that's all ok. I've put the majority of my toile together now, just got the sleeves and a cuff to prepare. But I'm hoping I'll be well enough to return to Bournemouth mid-week or so, so there will be plenty of time for me to get everything ready for the fitting. Reflecting on the unfortunate happenings and inconvenience of the past few weeks I've learnt that anything can go wrong or interfere with something at any time and there is no way you can be prepared for it. So I've definitely figured that even though I'm behind schedule now and haven't been able to carry out much project work over the Easter break, I've still managed to try my best to accomplish as much as possible and as a result am still feeling confident that I can make this costume to a high standard reflecting the requirements of the client. Blood tests have confirmed Galndular Fever and I'll undoubtedly be suffering with it for a minimum of 12 weeks, but if I look after myself (which means no stress, no alcohol, and no lacking sleep) and pace myself wisely for the remainding duration of the project I will hopefully be able to meet the intended deadline with an almost finished costume.
Monday 5 April 2010
Week 4 Review - EASTER BREAK
Right so, so far the Easter break has been far from relaxing and enjoyable. I finished my first course of antibiotics on Wednesday night and was feeling much better. I even managed to get out of the house on Thursday and managed to put my toile together in the evening. I was called to work at the shop (Clarks) where I have been an employee for 5 years now yesterday morning. I was more than happy to say yes as I've been practically bed bound for well over a week now. But....I woke up yesterday morning with a very swollen throat and was rushed to morning surgery to be checked out. I've now had a double dose of antibiotics prescribed to me and walked away with a very attractive waterproof plaster on my right arm, (protecting the minute wound from a blood test) and also a soon-to-be-confirmed diagnosis for Glandular Fever. So not only did I manage to contract Tonsilitus and get rid of it, but I also managed to allow it to return ten times worse!! So this now means my work placement has been canceled (doctor's orders) and I'm bed bound yet again! So I don't even know if I'll be making it back to uni on time for the start of term now. However I am more than able to use my laptop for further researching while I suffer (cue the violins) and I'm in touch with Chris Brown via text and e-mail (not phone as I have no voice) if there are any questions I may have for him. So my Easter break very much consists of further researching via internet in bed, socialising via internet in bed, and recovering as fast as I can, not via internet, but in bed.
Sunday 28 March 2010
Week 3 Review
This week has been an horrific week!!!! Paid a visit to the doctors on Monday morning and they confirmed Tonsilitus..GREAT!! (or not) Luckily I managed to cut all my Calico pieces for my toile last Friday so when I'm feeling well enough it shouldn't take me too long to put it all together. However I'm supposed to be starting my work placement at the Exeter Northcott Theatre tomorrow morning and it's looking very unlikely that I'll be there for 9am. Have contacted the wardrobe supervisor warning her of my current situation/condition and she has very nicely said to make my way when I'm feeling 100% again. She's advised I have a weeks rest and make my way up there for next Monday so the next few days are going to have to be played by ear but I'm keeping everything crossed that I can wake up in the morning and feel right as rain again.
I also missed out on the Alice In Wonderland Parade on Tuesday. I'm wearing one of the costumes for the end of year show so I was totally gutted that I couldn't participate in that this week. On the upside though, I have all my work with me (I'm now at home in Cornwall as my Mum thought it was best for me to come home - and of course Mum's know best) so I can use my sewing machine here and whizz up my toile so it's all ready for my first fitting when I return to uni after Easter. The only thing I've learnt from this week is that Tonsilitus is highly inconvenient and I'm not going to get this week back to catch up :( So any moment where I feel even the slightest bit better will be spent doing as much work as I can in order to get back on track.
I also missed out on the Alice In Wonderland Parade on Tuesday. I'm wearing one of the costumes for the end of year show so I was totally gutted that I couldn't participate in that this week. On the upside though, I have all my work with me (I'm now at home in Cornwall as my Mum thought it was best for me to come home - and of course Mum's know best) so I can use my sewing machine here and whizz up my toile so it's all ready for my first fitting when I return to uni after Easter. The only thing I've learnt from this week is that Tonsilitus is highly inconvenient and I'm not going to get this week back to catch up :( So any moment where I feel even the slightest bit better will be spent doing as much work as I can in order to get back on track.
Monday 22 March 2010
SDP Timetable
Self Directed Project Schedule
• Weekend
• POP
• Easter
Day/Date Start Time Finish Time Learning and Teaching Staff
Tues 09/03/10 09:30 11:00 Re-focus and learning agreements meeting AK, GC
Weds 10/03/10 09:30 16:30 Men’s 18th Century Research
Thurs 11/03/10 13:30 14:30 Kick Start Tutorial/Write Learning Agreement GC
Fri 12/03/10 10:00 12:00 First General Meeting with Chris Brown
Sat 13/03/10 Continue with general historical research/Blog
Sun 14/03/10 Continue with general historical research/Blog
Mon 15/03/10 13:30 17:00 Write unit schedule/continue with research
Tues 16/03/10 09:30 16:30 Tutorial/Begin Drafting Basic Blocks GC
Weds 17/03/10 09:30 16:30 Basic Blocks/Historical Pattern Research
Thurs 18/03/10 09:30 16:30 Historical Pattern Adapting
Fri 19/03/10 09:30 16:30 Historical Pattern Adapting
Sat 20/03/10 Continue with patterns/research/blog
Sun 21/03/10 Continue with patterns/research/blog
Mon 22/03/10 09:30
13:30 13:30
15:30 Historical Pattern Adapting/Cut Calico
POP – Carnival, street performance & dance
WH
Tues 23/03/10 09:00
09:30
13:30 13:30
10:00
18:00
Cut Calico/Begin Toile Construction
Hand in Learning Agreement
Concepts In Context – Costume Parade
AK, GC
Weds 24/03/10 13:30 16:30 Toile Construction
Thurs 25/03/10 10:00 16:00 Toile Construction
Fri 26/03 – Sun 11/04/10 EASTER BREAK
Mon 12/04/10 09:30 16:30 Toile Construction
Tues 13/04/10 09:30 16:00 Toile Construction/Research/Tutorial GC
Weds 14/04/10 Day Off
Thurs 15/04/10 09:30 16:00 Toile/Research/Blog
Fri 16/04/10 10:00 16:00 Toile/Research/Blog
Sat 17/04/10 10:00 16:00 Meeting With Kelly/Finishing Toile
Sun 18/04/10 Day Off/Fitting Preparation
Mon 19/04/10 09:30
15:30 15:30
16:00 Toile Fitting/Collect fabric samples from archive
POP - Tutorial GC
WH
Tues 20/04/10 09:30 16:30 Tutorial/H.E.Box Trip – Fabric Sourcing GC
Weds 21/04/10 10:00 16:00 Pattern/Toile Alterations
Thurs 22/04/10 10:00 16:00 Pattern/Toile Alterations
Fri 23/04/10 10:00 16:00 Cut Top Fabric/Lining
Sat 24/04/10 11:00 15:00 Work on top fabric/Blog
Sun 25/04/10 11:00 15:00 Work on top fabric/Blog
Mon 26/04/10 09:30
11:30 16:30
12:30 Costume Construction
POP - Tutorial
WH
Tues 27/04/10 09:30 16:30 Costume Construction/Blog
Weds 28/04/10 09:30 16:30 Costume Construction/Blog
Thurs 29/04/10 09:30 16:30 Costume Construction/Blog
Fri 30/04/10 09:30 16:30 Costume Construction/Blog
Sat 01/05/10 10:00 16:00 Costume Construction/Blog
Sun 02/05/10 10:00 16:00 Costume Construction/Blog
Mon 03/05/10 09:30
11:30 16:30
12.30 Costume Construction/Blog
POP - Tutorial
WH
Tues 04/05/10 09:30 16:30 Costume Construction/Blog
Weds 05/05/10 09:30 16:30 Costume Construction/Blog
Thurs 06/05/10 09:30 16:30 FINAL FITTING/ Costume Work GC
Fri 07/05/10 09:30 15:00 Costume Alterations
Sat 08/05/ – Sun 09/05/10 Return Home For Weekend
Mon 10/05/10 09:30
09:30 16:30
10:00 Costume Work: Linings, Finishings & Fastenings
POP Hand In
WH
Tues 11/05/10 09:30 16:30 Costume Work: Linings, Finishings & Fastenings
Weds 12/05/10 09:30 16:30 Costume Work: Linings, Finishings & Fastenings
Thurs 13/05/10 09:30 16:30 Costume Work: Linings, Finishings & Fastenings
Fri 14/05/10 09:30 16:30 Costume Work: Linings, Finishings & Fastenings
Sat 15/05/10 09:00 17:00 General Finishing Work: Costume & Blog
Sun 16/05/10 09:00 17:00 General Finishing Work: Costume & Blog
Mon 17/05/10 09:30 10:30 HAND IN AK, GC
Week 2 Review
So this week has been yet another learning curve. Even though I've drafted similar patterns before, especially in the most recent unit, the patterns were much smaller and I had to consider that they were male patterns to fit a female. This time however I'm having to draft for a much larger individual and so I've often looked at the patterns this week and thought something isn't quite right. I've felt a lot more confident with historically adapting the patterns, practice is obviously helping me understand pattern drafting and I've become faster at producing them. Another thing this week which has taught me a lot is the fact I've had to draft my patterns alongside Kelly who is creating Eddie's costume. Her patterns are much much smaller but we've had to work together to make sure they are identical and in proportion with one another. This is something I have really enjoyed doing this week. I've had to look at identical patterns on both ends of the scale and work professionally with a course mate. We have learnt from eachother and as a result managed to draft the patterns successfully and be ahead of schedule. On Friday we were ready to trace patterns and cut out in Calico.
Saturday 20 March 2010
SDP Learning Agreement
NAME: Jenna Goldsmith
COURSE: BA (Hons) Costume with Performance Design
UNIT TITLE: Self Directed Project
REF. NO./LEVEL: CSS518
WEIGHTING: 2.0
DURATION: 9 Weeks
HOURS OF STUDY: 300 Hours
Unit Leader: Adele Keeley
DESCRIPTION:
For this study unit I will be working to produce a new 18th Century costume for the Wimborne Town Crier. I’ve been eager to produce something that is significant to a local town community and heritage and so I’m very proud and excited to have embarked on this.
Previous units such as Defining Practice and Concepts in Context have involved particular aspects of tailoring which have inspired me to further this skill and seriously consider it as my future specialism. This project will allow me to practice these skills to an even higher level and challenge me to achieve the best of my ability. The current costume is approximately six years old and still in good condition, however, the client is requesting a new one and so it is now up to me to research thoroughly into the 18th century and work with combined ideas from both the client and myself as the maker to inform my interpretation. The project will be funded by the Arts University College at Bournemouth using a flexible budget. The Town Crier is a very important and respected individual for Wimborne and also cries for the AUCB’s graduation ceremonies. This means I will have to carefully consider the image and what will be most appropriate from a practicality and aesthetics point of view – The costume must be just as important and appreciated as the Town Crier himself and reflect the correct personality.
I will carry out this project by following a clearly constructed time plan which means it will be organised around me, the client, and other projects I’ll be working on alongside - What I plan to do will be feasible in the time I have. For assessment purposes I will produce and deliver a 3-piece costume consisting of a pair of breeches, a waistcoat and a frock coat. The entire ensemble will be constructed based upon relevant research and the requirements of the client.
Aims:
A1 To provide opportunities for self-initiated, autonomous learning
and develop the ability to plan time and work independently
A2 To provide opportunity to study the contextual development of costume and performance design
A3 To further develop the creative, intellectual and practical applications of research and contextualisation within a self initiated environment
A4 To propose, develop and evaluate professional aspirations through professional development planning
Learning Outcomes:
On completion of this unit you will be able to:
LO1 Identify and define the context for the development of your own work towards professional aspirations
LO2 Demonstrate an understanding of the development of costume and performance design
LO3 Have developed the creative, intellectual and practical applications of research and contextualisation
LO4 Consolidate and demonstrate professional aspirations and planning through your Progress File
Assessment Requirements:
A 3-piece costume (frock coat, waistcoat and breeches), an internet blog, and a patterns/research file, under pinned by personal development planning (in your blog journal) and a final written evaluation (750 words) evidenced in your Progress File 100%
Each assessment requirement must be passed at a minimum grade of 40% to successfully complete the unit.
Assessment Criteria (specific criteria related to the learning outcomes and linked to the statement of generic assessment criteria matrix):
1. Evidence of knowledge of contextual and theoretical issues – The level to which you have considered the context of your project and evidenced that to your body of work (LO1, LO2)
2. Evidence of understanding through synthesis and development – The application and extend to which research has informed decision-making and project development together with the appropriate management of time (LO2, LO3, LO4)
3. Evidence of evaluation and reflection – The extent to which you have reflected on the progress of your project and used it to inform personal development planning (LO4)
4. Evidence of realisation through the communication of ideas - The presentation of your work and the level to which specialist knowledge has been applied, communicated and evidenced (LO3, LO4)
Reference Material
This will vary according to the needs of the individual project. You will define Reference Material through personal investigation and consultation with staff and list it in your Learning Agreement.
Friday 19 March 2010
Further Useful Findings

Frock Coat: Coats are generally made of a good close and regular weave wool. They can be with or without a collar and cuffs and either single or double breasted. Coats are not for "dress" - all classes wore coats, from the upper class to slaves. The difference would be the quality of construction and material. Generally made of wool or linen. Coats of the 1750's tended to be full with large cuff, while those of the 1770's were more fitted with smaller features.
Jacket / Sleeved Waistcoat: A short coat of wool or linen with sleeves ending in either a buttoned cuff or a slit. Mostly a working class piece of clothing.

Breeches: Breeches can be made of wool, linen or leather. Breaches of the 1770's had a "fall front" or a flap in the front, which buttons near the waistline, covered by the waistcoat. An earlier style was the "fly front", which buttoned up in the middle of the front and would have been hidden by the longer waistcoats of the 1750 - 60's. The legs end about one or two inches below the knee and close with five horn, wooden, or white metal buttons or four buttons and either a buckle or drawstring. Breeches should be well fitted, rather than tight in the legs and waist with an excess in the seat. Leather breeches were very popular in New Jersey; made of buckskin by the working classes for durability.When picking a style, either fall or fly front, make sure that your breeches, waistcoat, and coat are of the same period.

Waistcoats: Mid-century waistcoats were cut mid-thigh, but by the 1770's they would get shorter, long enough to cover the waistband buttons and shirt completely. They were made of materials such as silk or a lightweight linen or wool which would be either solid, striped or patterned. Regardless of style, a waistcoat should be long enough to cover the front buttons of one's breeches.
Tuesday 16 March 2010
Helpful Research References
 The pattern above is a Norah Waugh pattern 1720's. I think this is the cut I will use for the frock coat - after running it by Chris.


Monday 15 March 2010
Week 1 Review
This week has been a good initial start to the project. I've managed to collect a lot of relevant research to get me started confidentally. I've revisited the early 18th century and now understand exactly what sort of thing I will be creating for my client. I've had my first meeting with Chris Brown which was highly successful and devised my schedule for the next 8 weeks or so. Knowing what my client wants/needs/requires from this project, I'm feeling fairly confident about being organised and sticking to a strict schedule.If there's one thing I've learned from previous projects, it's that I'm not a very good example of successful time management. This week has already opened my eyes to the fact this project is not only important to myself and the client but also to the university and the community. I've really got to throw all of my passion and time into this project now. I know I'm a perfectionist when it comes to producing work but I think the next 8 weeks are going to perfect my precision and tailoring skills to a new level..fingers crossed..let's go!
Sunday 14 March 2010
18th Century Military Wear
Chris has informed Kelly and myself that he likes to have a military element to his costumes. Looking at 18th century military images it appears that the detail was quite simple but certain patterns made quite a bold statement. We shall refer to the research we have so far as well as collecting more throughout the project so that the idea is always fresh in our mind. We will consider military designs when looking for our costume decoration and fastenings.
The images below are those of early 18th century military wear, replicas, and modern day military fashion with historical influences that we have come across so far.


The images below are those of early 18th century military wear, replicas, and modern day military fashion with historical influences that we have come across so far.


Saturday 13 March 2010
Historical Research
I took some general 18th century research to the meeting with Chris yesterday and he really liked the styles from the earlier part of the century, 1720's. The current costume is more mid-century and he'd like a little bit of a change this time.

 The earlier part of the century meant the waistcoat was full length, sitting a little higher than the length of the frock coat. The frock coat was made with pleats falling at the side and at the back giving a fuller and more structured silhouette that was very pleasing to the eye and flattering. The pleats lay open to accommodate for a sword and give comfort for riding.
The sleeve cuffs were also very large sitting in the crook of the elbow and hanging away from the sleeve. This is a feature Chris really likes especially as he often needs to use crutches so it will disguise that nicely and we agreed the cuffs would make a bold statement.

 The picture above shows a young boy dressed in what is virtually a replica of the adult male ensemble. This is where Kelly and I will have to work together very closely in order to create two costumes that reflect one another to the requirements of our client but also succeed in being historically accurate.
Men's coats were still rather sombre in hue, embroidery being reserved for the decoration of the waistcoat, which was often the most valuable part of the costume, unless the lace ruffles of the shirt were exceptionally fine.
This may be an historical element to the costume, but the issue we have is that we would have to find a patterned fabric that would suit both Chris and Eddie. If the pattern is too big, Eddie will be drowned in the costume and it just won't work. This may mean we will have to consider having a plainer fabric for the waistcoat and apply more detail to the frock coat.
Below is an image of a childs suit, very simply the smaller version of an adults.
The frock coat for this period never fully fastened. This was to show the detail of the waistcoat underneath. The coat may have fastened from the top to a little under half way down and then flared out to reveal the waistcoat.
Subscribe to:
Posts (Atom)
